How to Remove Hosta Blooms: A Simple Deadheading Guide

Hosta flowers shoot up on tall stalks every summer, and not every gardener wants to keep them.
Some hosta varieties send up blooms that flop over, block the view of those gorgeous leaves, or just don’t add much to the plant’s overall look.
If you’d rather keep your hosta looking clean and full, removing the blooms is a quick job that takes just a few minutes.
I remove blooms on some of my hostas each season and leave them on others, depending on the variety and how the flower stalk looks.
In this guide, I’ll walk you through when to cut hosta blooms, exactly how to do it, and what happens to the plant afterward.
Why Remove Hosta Blooms?
Hostas are grown mostly for their leaves. The flowers are a bonus, not the main event, and some gardeners find the tall bloom stalks awkward looking next to the low mounded foliage.
Removing them keeps the plant’s shape tidy and puts the focus back on the leaves.
There’s also a practical reason. Producing flowers and seeds takes energy. When you cut the bloom stalk before it goes to seed, that energy gets redirected back into the plant’s root system and foliage instead.
Note: Removing hosta blooms is entirely optional. It won’t hurt your plant if you leave them alone, and hosta flowers attract hummingbirds and bees. If pollinators visit your garden regularly, you might want to let at least a few blooms stay.
Also read: Why Are My Hosta Leaves Getting Holes? Common Causes and Fixes
When to Remove Hosta Blooms
Timing depends on what you’re going for.
If your only goal is a neater look, wait until the flowers fade and start to brown, then cut the whole stalk down. This lets you enjoy the blooms first.
If you’d rather skip the flowers altogether and put all the plant’s energy into leaf growth, cut the flower stalk (called a scape) as soon as you spot it emerging from the center of the plant.
Hosta scapes are easy to recognize. They shoot straight up above the foliage and look noticeably different from the leaf stems.
There’s a difference between deadheading and removing the whole scape. Deadheading means snipping off just the spent flowers, leaving the stalk in place. Removing the scape means cutting the entire stalk at its base.
For hostas, most gardeners skip deadheading individual flowers and just remove the whole stalk once they’re done blooming, since new flowers won’t form on that same stalk anyway.
Read more: What Causes Hosta Leaves To Curl and Quick Fixes You Can Try
Tools You’ll Need
You don’t need much for this job.
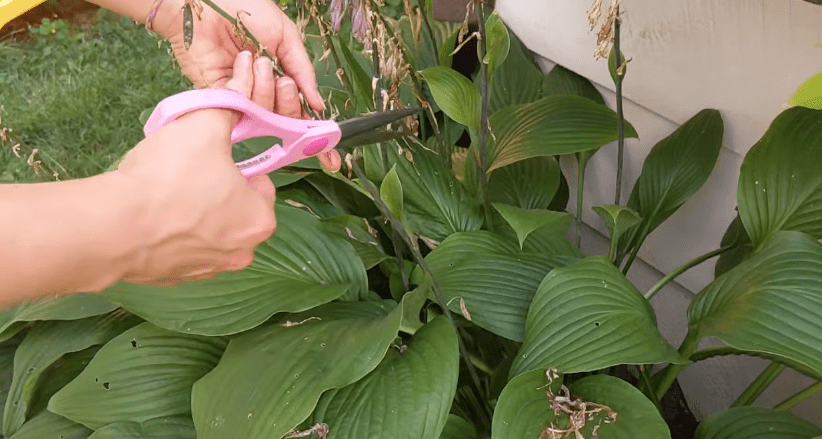
- A pair of clean, sharp pruning shears or garden scissors
- Garden gloves, if you prefer them
- Rubbing alcohol or a disinfecting wipe to clean your blades before and after
Sharp tools make a clean cut and reduce stress on the plant. Dull blades can crush the stalk instead of slicing through it, which leaves a ragged wound that takes longer to heal.
Wiping your shears down before you start also helps stop the spread of disease between plants, especially if you’re working your way through several hostas in one session.
How to Remove Hosta Blooms Step by Step
Once you’ve decided when you’re removing the bloom, the process itself is simple.
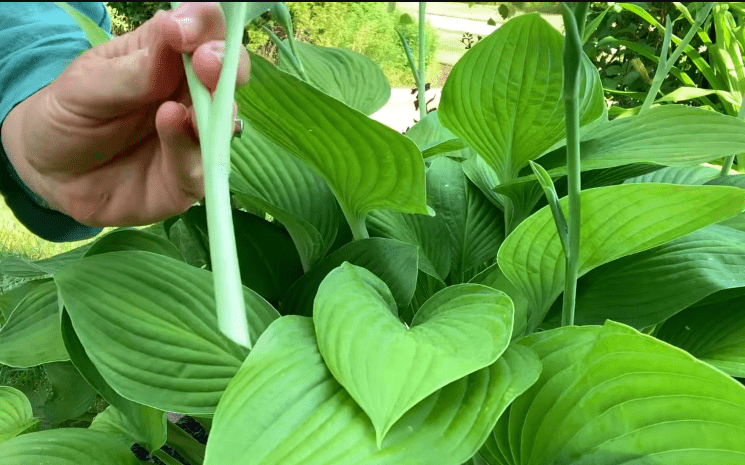
- Follow the flower stalk down to where it meets the base of the plant, right at soil level among the leaves.
- Cut the stalk as close to the base as you can without nicking nearby leaves.
- Make one clean cut rather than sawing back and forth.
- Set the cut stalk aside and check the plant for any other scapes, since hostas often send up more than one.
Try to avoid cutting into the crown of the plant, which is the point where the leaves and roots meet. That’s the part of the hosta you want to protect.
If you’re not confident about exactly where the stalk starts, cut a little higher up rather than risk damaging the crown. You can always trim the stub closer later.
Once you’ve made your cuts, the leftover stalks can go straight into your compost pile or yard waste. There’s no need to treat them any differently than other garden trimmings.
Should You Cut the Scape Early or Let It Bloom First?
This comes down to personal preference, and I go back and forth depending on the hosta.
Cutting early, before the scape has a chance to flower, sends the most energy back into the plant’s leaves and roots.
If you have a variety with a bloom you don’t particularly like, or if your hosta is still young and establishing itself, cutting the scape early can help the plant put its resources into growing bigger and fuller instead.
Waiting until after the bloom fades lets you enjoy the flowers, which can be fragrant and attract pollinators, before tidying the plant up.
This is what I usually do with my more established hostas. The blooms don’t last long, so there’s no real downside to letting them run their course before cutting them back.
Either approach is fine. Hostas are forgiving plants, and removing the scape at any point won’t set the plant back in any serious way.
Aftercare: What Happens After You Cut
Once the bloom stalk is removed, the hosta won’t produce a new flower on that same stalk this season.
That energy shifts toward the plant’s leaves and root system instead, which can mean fuller foliage by the end of the growing season.
Keep watering and caring for your hosta as usual after deadheading. There’s no special aftercare required.
If your hosta is actively growing, a light feeding with a balanced fertilizer can support that redirected energy, but it’s not necessary just because you removed the blooms.
Check your hosta again in a week or two. Some varieties send up multiple scapes over the course of a season, so you may find yourself repeating this process a few times before summer ends.
Common Mistakes to Avoid
A few small missteps can make this job harder than it needs to be.
- Cutting too close to emerging leaves. Take a moment to see where the scape separates from the foliage before you cut, so you don’t accidentally nick a healthy leaf.
- Using dull or dirty shears. This can crush the stalk or spread disease between plants. Keep your blades sharp and clean.
- Pulling instead of cutting. Yanking a scape out by hand can damage the crown or disturb the roots. Always cut, don’t pull.
- Waiting too long to check for new scapes. Hostas can surprise you with a second or third bloom stalk later in the season, so it’s worth a quick check every so often.
A Simple Job That Pays Off
Removing hosta blooms isn’t complicated, and it’s easy to fit into a few minutes of garden maintenance.
Whether you cut the scape early to focus on foliage or let the flowers bloom first before tidying up, your hosta will handle either approach without any trouble.
Take a walk through your garden this week and see which of your hostas have sent up flower stalks. A quick trim now can keep your plants looking full and healthy right through the rest of the growing season.